Setup Contact Fields is the list of information a contact can have for your company — first name, phone, email, and any custom fields you add.
This page does not edit a person’s contact record. Changing a default here does not overwrite names, phones, or emails already saved on contacts.
Open from Manage → Setup Contact Fields. The page title is Contact Fields.
✨ What you can do#
- See every field a contact can have
- Add extra fields (for example City, Lead Source, or a custom note)
- Copy the Fields Key for SMS, email, workflows, and similar messages
- Set a Custom Default Value used only when that field is empty on a contact
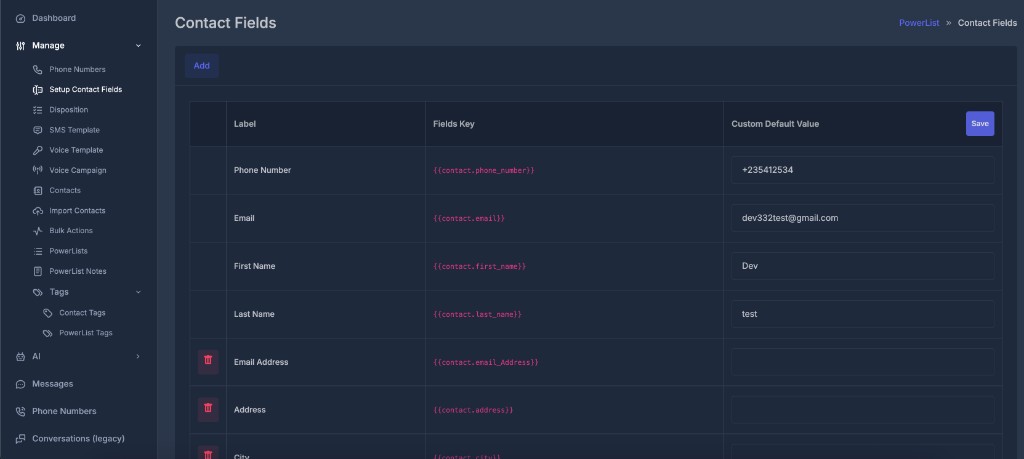
The header has Add. Save sits on the right of the Custom Default Value column header.
| Column | What it is |
|---|---|
| (trash icon) | Deletes a custom field. Core fields do not show a trash icon. |
| Label | Friendly name, such as First Name or Phone Number |
| Fields Key | Placeholder for messages, such as {{contact.first_name}} |
| Custom Default Value | Optional fallback text when that field is empty on the contact |
Click Save after you type or clear defaults. A success message confirms they were saved.
🔒 Core fields (cannot delete)#
- Phone Number
- First Name
- Last Name
🔑 Fields Key#
A Fields Key is a placeholder. When a message is sent, it is replaced with that contact’s value.
Example: {{contact.first_name}} → Dev if the contact’s first name is Dev.
Use the key exactly as it appears in the table. Do not change spelling or capitalization.
- Paste the key into an SMS, email, note, or template
- In the workflow builder, use Insert field to pick the same keys from a dropdown
📝 Custom Default Value#
A Custom Default Value is company-wide fallback text for one field. It is not the contact’s saved value.
When the default is used
| Contact has a value? | Default saved? | What goes into the message |
|---|---|---|
| Yes | Yes or no | The contact’s value. Default is ignored. |
| No (empty) | Yes | The Custom Default Value |
| No (empty) | No | Blank — no error |
What a default does not do
- Does not change Contacts, PowerLists, or import files
- Does not replace a field that already has data on that contact
- Does not fill the Contacts screen
How to save a default
- Open Setup Contact Fields
- Type the fallback in Custom Default Value
- Click Save in that column header
- Clear a box and click Save to remove that field’s default
Example: First Name default Dev is used only when first name is blank. A contact named Sara still gets Sara.
Where defaults and keys are used
After you save, they apply wherever a message uses a Fields Key and that field is empty:
- Conversations SMS
- Workflow SMS, email, RCS, and notes
- Google Calendar event title and description
- Chatbot SMS replies
- AI agent calendar booking text
If the contact already has a value, that value is always used.
➕ Add a contact field#
Use Add when you need a new piece of information on contacts.
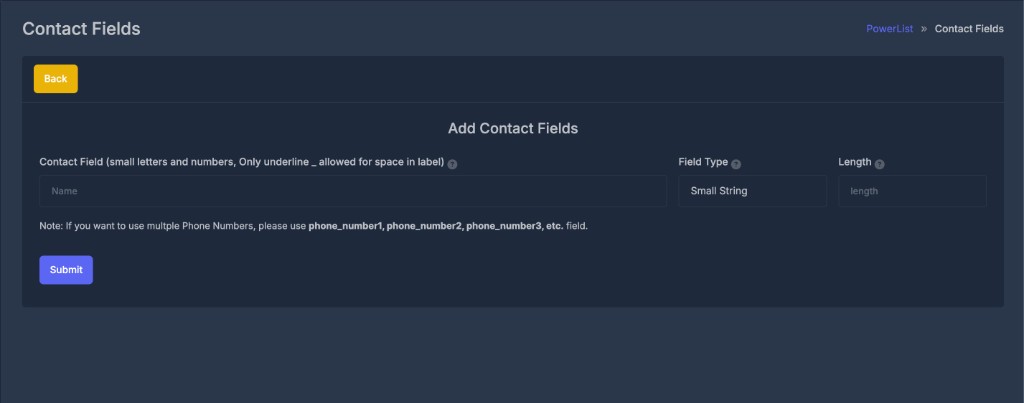
- Click Add
- Enter the field name using lowercase letters, numbers, and underscores only (spaces become underscores) — for example
lead_source,phone_number1 - Choose the field type:
- Small String — short text (you can set a length)
- Text — medium text
- Long Text — large blocks of text
- Click Submit
The label under the name box shows how the name will look (underscores become spaces).
For multiple phone numbers, add phone_number1, phone_number2, phone_number3, and so on.
Reserved names (main phone, email, first/last name) cannot be created again. Choose a different name if you see that message.
🗑️ Delete a contact field#
Only custom fields show a trash icon. You cannot delete Phone Number, Email, First Name, or Last Name.
- Click the trash icon
- Confirm
That column is removed from contacts, and any Custom Default Value for that field is removed too.
🔧 Insert field in the workflow builder#
When a workflow step has a message (SMS, email, notes, calendar title, and similar):
- Open the step in the builder
- Use Insert field next to the text box
- Choose a contact field
- The matching Fields Key is inserted
The list includes your company’s fields from Setup Contact Fields, including custom fields you added.